LInux学习笔记
有云转晴
一、Admin
1.1
1.1.1云计算介绍
1.1.2 TCP/IP协议及配置
1.2
1.2.1Linux系统简介
1.2.2安装Linux系统
1.2.3Linux基本操作
1.3
1.3.1命令行基础
1.3.2目录及文件管理
1.3.3文本内容操作
1.4
1.4 .1归档及压缩
1.4 .2重定向与管道操作
1.4 .3find精确查找
1.4 .4vim高级使用
1.5
1.5.1RPM软件包管理
1.5.2Yum软件包仓库
1.6
1.6.1用户管理
1.6.2组账号管理
1.6.3计划任务
二、Englneer
2.1
2.1.1基本权限和归属
2.1.2附加权限
2.1.3ACL策略管理
2.2
2.2.1磁盘空间管理
2.2.2交换空间
2.3
2.3.1逻辑卷管理
2.3.2VDO
2.3.3RAID磁盘阵列
2.3.4进程管理
2.4
2.4.1配置Linux网络
2.4.2日志管理
2.5
2.5.1SELinux
2.5.2系统故障修复(找回密码)
2.5.3防火墙策略管理
2.5.4服务管理
三、Services
3.1
3.1.1Web基础应用
3.1.2NFS服务基础
3.1.3触发挂载
3.2
3.2.1DNS服务基础
3.2.2特殊解析
3.2.3缓存DNS
3.2.4DNS主从架构
3.3
3.3.1Split分离解析
3.3.2NTP时间同步
3.3.3电子邮件通信
3.3.4自定义Yum仓库
3.4
3.4.1批量装机环境
3.4.2配置PXE引导
3.4.3kickstart自动应答
3.4.4Cobbler装机平台
3.5
3.5.1rsync同步操作
3.5.2源码编译安装
3.5.3 inotify实时同步
3.5.4 数据库基础
3.5.5命令补充
3.6
3.6.1Linux容器基础
3.6.2Linux容器管理
3.6.3podman命令行
3.6.4管理容器进阶
四、Network
4.1
4.1.1 计算机网络
4.1.2网络通信参考模型
4.1.3 交换机命令行
4.1.4交换机命令行配置
4.1.5数据链路层解析
4.2
4.2.1VLAN技术及应用
4.2.2TRUNK
4.2.3网络层解析
4.3
4.3.1OSPF
4.3.2传输层
4.3.3 ACL
4.4
4.4.1 NAT
4.4.2VRRP
4.5
4.5.1远程登录
4.5.2数值
4.5.3无类网络
4.5.4ipv6
4.6
4.6.1综合项目
4.6.2网络升级
五、Shell
5.1
5.1.1Shell概述
5.1.2编写及执行脚本
5.1.3Shell变量
5.1.4数值运算
5.2
5.2.1条件测试
5.2.2if选择结构
5.2.3循环结构
5.3
5.3.1case语句
5.3.2函数及中断控制
5.3.3字符串处理
5.4
5.4.1正则表达式
5.4.2sed基本用法
5.4.3sed应用案例
5.5
5.5.1awk基本用法
5.5.2 awk应用案例
5.5.3综合脚本
六、Operation
6.1
6.1.1Nginx安装
6.1.2用户认证
6.1.3Nginx虚拟主机
6.1.4HTTPS加密网站
6.2
6.2.1部署LNMP
6.2.2Nginx+FastCGI
6.2.3Nginx高级技术
6.3
6.3.1Nginx代理服务器
6.3.2Nginx优化
6.4
6.4.1Session与Cookie
6.4.2部署memcached
6.4.3Session共享
6.5
6.5.1Tomcat服务器
6.5.2Tomcat应用案例
6.5.3 Maven应用案例
6.6
6.6.1软件包管理
6.6.2systemd服务管理
6.6.3VPN服务器
七、Automation
7.1
7.1.1版本控制
7.1.2Git基础
7.1.3 Git进阶
7.2
7.2.1部署GitLab
7.2.2配置GitLab
7.2.3CI/CD概述
7.2.4部署Jenkins
7.3
7.3.1Jenkins项目管理
7.3.2构建分发服务器
7.3.3自动化上线
7.3.4 Ansible基础
7.4
7.4.1Ansible ad-hoc
7.4.2Ansible模块
7.5
7.5.1YAML语法
7.5.2Ansible Playbook剧本
7.5.3 Ansible变量
7.6
7.6.1Ansible进阶
7.6.2 Ansible Role
7.7
7.7.1项目练习
7.7.2 Ansible Vault
7.7.3 普通用户使用ansible
八、Cluster
8.1
8.1.1集群及LVS简介
8.1.2LVS-NAT集群
8.1.3LVS-DR集群
8.2
8.2.1Keepalived热备
8.2.2Keepalived+LVS
8.2.3HAProxy服务器
8.3
8.3.1 Ceph概述
8.3.2部署Ceph集群
8.3.3Ceph块存储
8.4
8.4.1块存储应用案例
8.4.2分布式文件系统
8.4.3对象存储
九、Security
9.1
9.1.1监控概述
9.1.2Zabbix基础
9.1.3Zabbix监控服
9.2
9.2.1Zabbix报警机制
9.2.2Zabbix进阶操作
9.2.3监控案例
9.3
9.3.1Prometheus服务器
9.3.2Prometheus被监控端
9.3.3Grafana
9.3.4监控数据库
9.4
9.4.1Kali系统
9.4.2扫描与抓包
9.4.3SSH基本防护
9.4.4服务安全
9.5
9.5.1 iptables防火墙
9.5.2 filter表控制
9.5.3扩展匹配
9.5.4nat表典型应用
十、Project1
10.1
10.1.1服务器硬件
10.1.2部署LNMP动态网站
10.2
10.2.1网站架构演变
10.2.2LNP+Mariadb数据库分离
10.2.3Web服务器集群
10.3
10.3.1 Keepalived高可用
10.3.2部署Ceph分布式存储
10.4
10.4.1部署Git版本控制系统
10.4.2优化Web服务器
十一、Python1
11.1
11.1.1Python概述
11.1.2环境准备
11.1.3Python起步
11.1.4数据类型概述
11.2
11.2.1判断语句
11.2.2while循环
11.2.3for循环
11.3
11.3.1文件对象
11.3.2函数基础
11.3.3模块基础
11.4
11.4.1 系统管理模块
11.4.2语法风格及布局
11.4.3 字符串详解
11.5
11.5.1 列表和元组
11.5.2 字典
11.5.3集合
十二、Python2
12.1
12.1.1时间方法
12.1.2异常处理
12.1.3文件系统相关模块
12.2
12.2.1函数基础
12.2.2函数高级应用
12.2.3模块
12.3
12.3.1OOP基础
12.3.2OOP进阶
12.3.3re模块
12.4
12.4.1PyMySQL模块
12.4.2多线程编程
12.4.3paramiko模块
12.5
12.5.1邮件和JSON
12.5.2requests模块
12.5.3api接口调用
十三、Rdbms1
13.1
13.1.1数据库服务概述
13.1.2构建MySQL服务
13.1.3数据库基本管理
13.1.4MySQL数据类型
13.2
13.2.1 表结构
13.2.2MySQL键值
13.3
13.3.1数据导入导出
13.3.2管理表记录
13.3.3匹配条件
13.3.4MySQL管理工具
13.4
13.4.1用户授权
13.4.2完全备份
13.4.3增量备份
13.5
13.5.1 增量恢复
13.5.2数据查询扩展
13.6
13.6.1percona软件介绍
13.6.2 innobackupex备份与恢复
十四、RDBMS2
14.1
14.1.1MySQL主从同步
14.1.2主从同步模式
14.2
14.2.1数据读写分离
14.2.2MySQL多实例
14.3
14.3.1 数据分片概述
14.3.2部署MyCAT服务
14.3.3测试配置
14.4
14.4.1MHA集群概述
14.4.2部署MHA集群
14.5
14.5.1 PXC
14.5.2MySQL存储引擎
十五、NOSQL
15.1
15.1.1NoSQL概述
15.1.2部署Redis服务
15.1.3部署LNMP+Redis
15.2
15.2.1创建集群
15.2.2管理集群
15.3
15.3.1主从复制
15.3.2持久化
15.3.3数据类型
本文档使用 MrDoc 发布
-
+
首页
4.1.5数据链路层解析
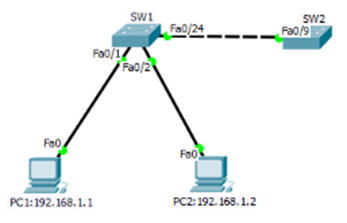
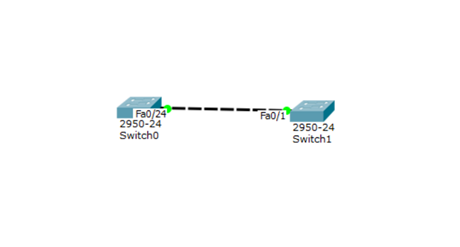
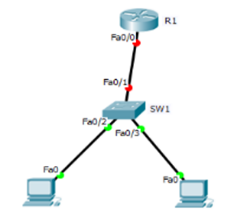
数据链路层解析 数据链路层解析 案例1:MAC地址表及邻居信息查看 案例2:配置接口速率及双工模式 案例3:配置交换机管理IP 1 案例1:MAC地址表及邻居信息查看 1.1 问题 本例要求为修改计算机名并加入工作组: 1)查看交换机MAC地址表 2)查看CISCO设备邻居信息 1.2 方案 网络拓扑,如图-1所示。  图-1 1.3 步骤 实现此案例需要按照如下步骤进行。 步骤一:查看交换机sw1的mac地址表 1)在PC1上ping PC2:192.168.1.2: PC>ipconfig /all FastEthernet0 Connection:(default port) Connection-specific DNS Suffix..: Physical Address................: 00E0.B079.7815 Link-local IPv6 Address.........: FE80::2E0:B0FF:FE79:7815 IP Address......................: 192.168.1.1 Subnet Mask.....................: 255.255.255.0 Default Gateway.................: 0.0.0.0 DNS Servers.....................: 0.0.0.0 DHCP Servers....................: 0.0.0.0 DHCPv6 Client DUID..............: 00-01-00-01-E3-E0-53-04-00-E0-B0-79-78-15 PC>ping 192.168.1.2 Pinging 192.168.1.2 with 32 bytes of data: Reply from 192.168.1.2: bytes=32 time=1ms TTL=128 Reply from 192.168.1.2: bytes=32 time=0ms TTL=128 Reply from 192.168.1.2: bytes=32 time=1ms TTL=128 Reply from 192.168.1.2: bytes=32 time=0ms TTL=128 Ping statistics for 192.168.1.2: Packets: Sent = 4, Received = 4, Lost = 0 (0% loss), Approximate round trip times in milli-seconds: Minimum = 0ms, Maximum = 1ms, Average = 0ms 2)查看PC2的IP信息 PC>ipconfig /all FastEthernet0 Connection:(default port) Connection-specific DNS Suffix..: Physical Address................: 0003.E49E.6445 Link-local IPv6 Address.........: FE80::203:E4FF:FE9E:6445 IP Address......................: 192.168.1.2 Subnet Mask.....................: 255.255.255.0 Default Gateway.................: 0.0.0.0 DNS Servers.....................: 0.0.0.0 DHCP Servers....................: 0.0.0.0 DHCPv6 Client DUID..............: 00-01-00-01-DB-A7-C6-5E-00-03-E4-9E-64-45 3)在查看交换机sw1的mac地址表 Switch#hostname SW1 SW1#show mac-address-table Mac Address Table ------------------------------------------- Vlan Mac Address Type Ports ---- ----------- -------- ----- 1 0003.e49e.6445 DYNAMIC Fa0/2 1 0010.1148.9309 DYNAMIC Fa0/24 1 00e0.b079.7815 DYNAMIC Fa0/1 步骤二:查看交换机sw1邻居信息 1)更改交换机sw2的主机名 Switch>enable SW2#configure terminal SW2(config)#hostname SW2 SW2(config)# 2)进入交换机SW1特权模式通过命令查看CISCO设备邻居信息: Switch#show cdp neighbors Capability Codes: R - Router, T - Trans Bridge, B - Source Route Bridge S - Switch, H - Host, I - IGMP, r - Repeater, P - Phone Device ID Local Intrfce Holdtme Capability Platform Port ID SW2 Fas 0/24 174 S 2950 Fas 0/9 案例2:配置接口速率及双工模式 2.1 问题 配置交换机接口双工模式为半双工,端口速率为10M并查看 2.2 方案 网络拓扑图如图-2  图-2 2.3 步骤 实现此案例需要按照如下步骤进行 步骤一:配置交换机接口模式 Switch>enable Switch#configure terminal Switch(config)#interface fastEthernet 0/24 Switch(config-if)#duplex half Switch(config-if)#speed 10 Switch#show interfaces fastEthernet 0/24 FastEthernet0/24 is up, line protocol is up (connected) Hardware is Lance, address is 00d0.5807.8301 (bia 00d0.5807.8301) BW 10000 Kbit, DLY 1000 usec, reliability 255/255, txload 1/255, rxload 1/255 Encapsulation ARPA, loopback not set Keepalive set (10 sec) Half-duplex, 10Mb/s input flow-control is off, output flow-control is off ARP type: ARPA, ARP Timeout 04:00:00 Last input 00:00:08, output 00:00:05, output hang never Last clearing of "show interface" counters never Input queue: 0/75/0/0 (size/max/drops/flushes); Total output drops: 0 Queueing strategy: fifo Output queue :0/40 (size/max) 5 minute input rate 0 bits/sec, 0 packets/sec 5 minute output rate 0 bits/sec, 0 packets/sec 956 packets input, 193351 bytes, 0 no buffer Received 956 broadcasts, 0 runts, 0 giants, 0 throttles 0 input errors, 0 CRC, 0 frame, 0 overrun, 0 ignored, 0 abort 0 watchdog, 0 multicast, 0 pause input 0 input packets with dribble condition detected 2357 packets output, 263570 bytes, 0 underruns 0 output errors, 0 collisions, 10 interface resets 0 babbles, 0 late collision, 0 deferred 0 lost carrier, 0 no carrier 0 output buffer failures, 0 output buffers swapped out Switch# 最长 = 0ms,平均 = 0ms 3 案例3:配置交换机管理IP 3.1 问题 配置交换机管理IP为192.168.1.1 ,默认网关为192.168.1.100 3.2 方案 网络拓扑图如图-3  图-3 3.3 步骤 实现此案例需要按照如下步骤进行 步骤一:配置交换机接口模式 1)配置路由器R1的接口IP作为192.168.1.0网段的网关地址 Router>enable Router#configure terminal Router(config)#interface fastEthernet 0/0 Router(config-if)#ip address 192.168.1.100 Router(config-if)#ip address 192.168.1.100 255.255.255.0 Router(config-if)#no shutdown 2)配置交换机管理IP和网关地址 Switch(config)#interface vlan 1 Switch(config-if)#ip address 192.168.1.1 255.255.255.0 Switch(config-if)#no shutdown Switch(config-if)#exit Switch(config)#ip default-gateway 192.168.1.100 3)用ping命令进行测试 PC>ipconfig FastEthernet0 Connection:(default port) Link-local IPv6 Address.........: FE80::200:CFF:FEE4:90B0 IP Address......................: 192.168.1.2 Subnet Mask.....................: 255.255.255.0 Default Gateway.................: 192.168.1.100 PC>ping 192.168.1.1 Pinging 192.168.1.1 with 32 bytes of data: Request timed out. Reply from 192.168.1.1: bytes=32 time=0ms TTL=255 Reply from 192.168.1.1: bytes=32 time=3ms TTL=255 Reply from 192.168.1.1: bytes=32 time=0ms TTL=255 Ping statistics for 192.168.1.1: Packets: Sent = 4, Received = 3, Lost = 1 (25% loss), Approximate round trip times in milli-seconds: Minimum = 0ms, Maximum = 3ms, Average = 1ms PC>ping 192.168.1.100 Pinging 192.168.1.100 with 32 bytes of data: Reply from 192.168.1.100: bytes=32 time=50ms TTL=255 Reply from 192.168.1.100: bytes=32 time=0ms TTL=255 Reply from 192.168.1.100: bytes=32 time=0ms TTL=255 Reply from 192.168.1.100: bytes=32 time=0ms TTL=255 Ping statistics for 192.168.1.100: Packets: Sent = 4, Received = 4, Lost = 0 (0% loss), Approximate round trip times in milli-seconds: Minimum = 0ms, Maximum = 50ms, Average = 12ms
有云转晴
2022年2月18日 19:16
转发文档
收藏文档
上一篇
下一篇
手机扫码
复制链接
手机扫一扫转发分享
复制链接
Markdown文件
分享
链接
类型
密码
更新密码